Showing posts with label fall. Show all posts

Friday, October 12, 2012

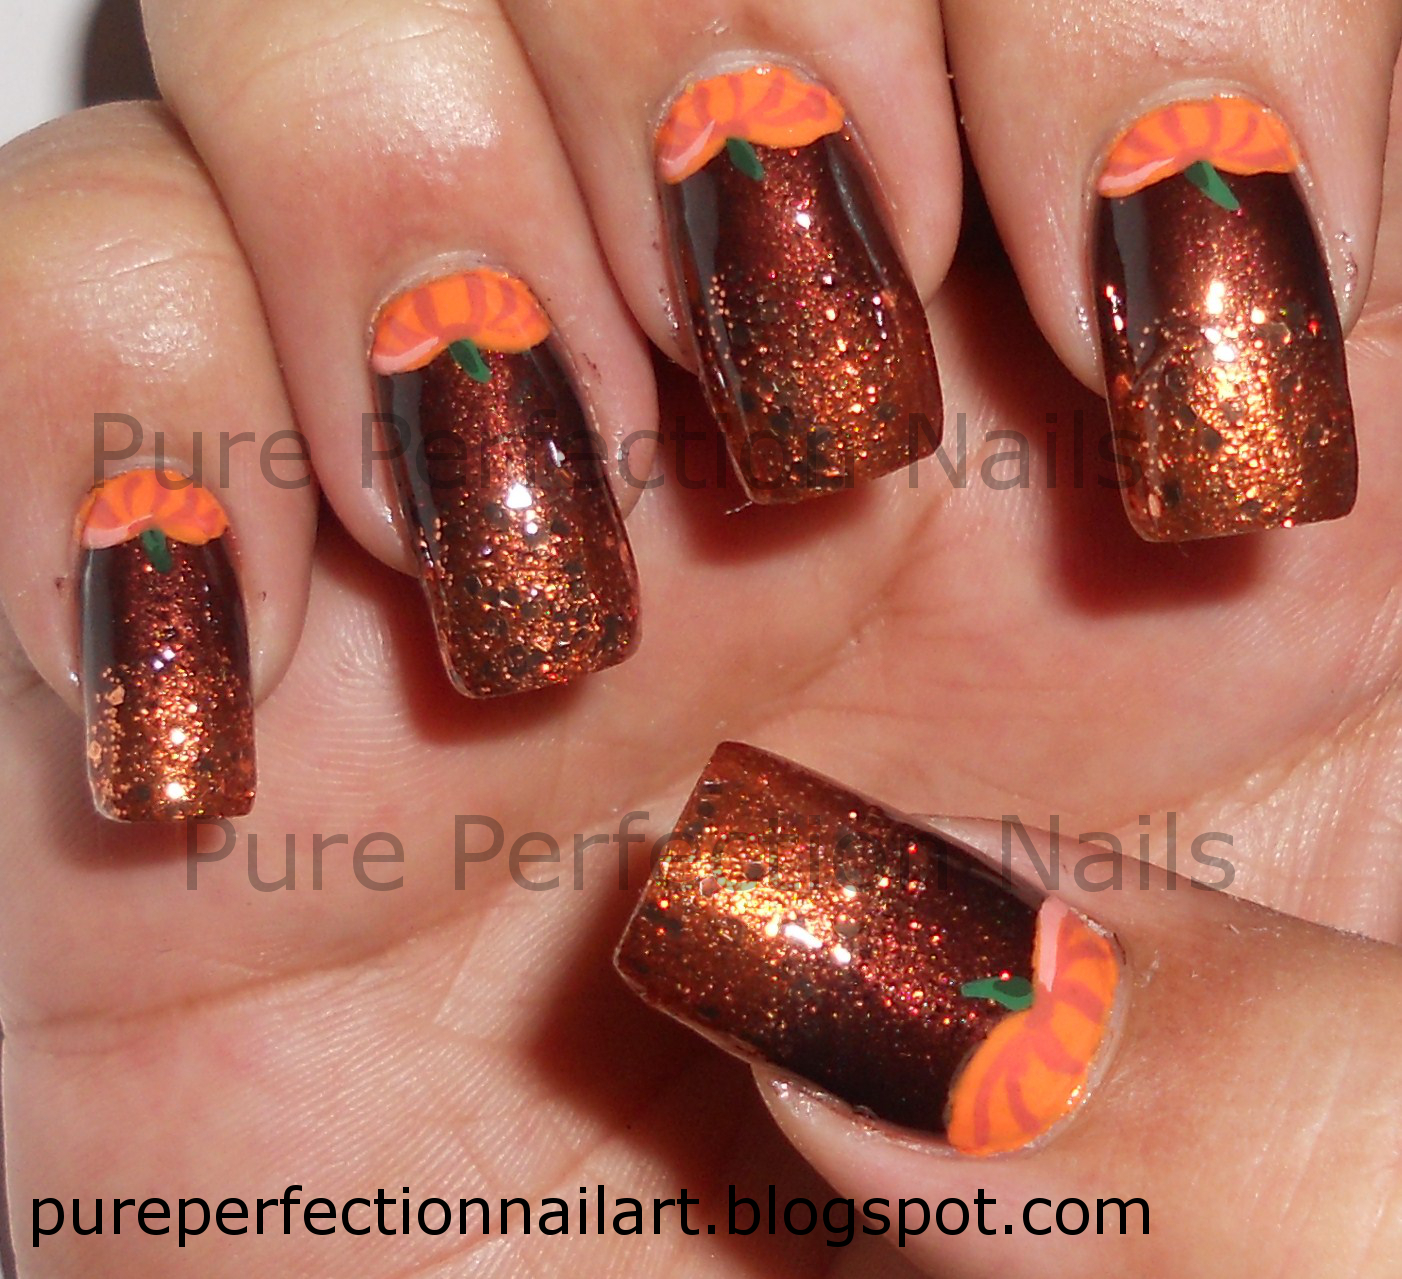
"Pumpkin Hunt" Halloween, Fall, Thanksgiving Nail Art

I LOVE Pumpkin!
coffee, cake, pie, cookies, candles, anything..
so I just had to put them on my nails.

So here we go!
 Sally Hansen Insta-Dri "Coco A-Go-Go"
Finger Paints "Fall of Surprises"
China Glaze "Harvest Moon #1129"
1 coat of "Harvest Moon"
sponge a fade with "Coco A-Go-Go"
and add "Fall of Surprises" to the tip...

Then paint in your pumpkins....that's in the video!


 I love this design...and I hope you do to...

 Don't Forget To Follow....It's Painless I Promise

*TILL NEXT TIME*


Friday, October 5, 2012

"Black Cat Crossing" Halloween Nail Art

Here is my first nail art using Glitter Paper!!
Don't know what that is check out my Glitter Paper post & video on how to make it.
This design is cute and simple.


Let Me Know What You Think...

 Don't Forget To Follow....It's Painless I Promise

*TILL NEXT TIME*

Thursday, October 4, 2012

Frankenstein Inspired Halloween Stamping Nail Art

I wanted to do some stamping today...
So I will keep the talking short as usual...
Here it is...
1. Started with 2 coats of Sinful Colors "Exotic Green #1105"
2. French tips with Sinful Colors "Black On Black #103"
Nail Stamping Plate from www.nailartsqueen.com
Used Sally Hansen Insta-Dri "Presto Pewter" to stamp.
Topcoat & Done!!!

Don't Forget To Follow....It's Painless I Promise
TILL NEXT TIME!!!

Wednesday, October 3, 2012

Spider Web French Stamping Nail Art

I had some time between clients today so I decided to do a quick design.
It is one anyone can do!
I am using french tape here....why? it's simple!
1. Place on french tape and paint the tips black.

 2.Now tape off the rest of the nail plate.

I used green tape here so you could see it better.
3.Pick any stamping plate you want with a spider web

4.Stamp using any silver polish that stamps well for you.

5.Remove all the tape.

6.Add a black crystal for the body...black dot for the head...and add 8 legs.
Topcoat and Done!

This is a very fast and simple nail design to do.
Not much painting skill is needed for this.....just painting legs!
Black-Sally Hansen Xtream-Black On Black
Silver-Sally Hansen InsaDri-Metallic Momentum

 Don't Forget To Follow....It's Painless I Promise

*TILL NEXT TIME*


Sunday, September 30, 2012

NEW Sally Hansen Limited Edition Diamond Strength

NEW Sally Hansen Limited Edition Diamond Strength
 (Found at Rite-Aid $4.99)

There are 8 colors in this collection:

Light Pink- Sparkling Rose
White w/ Blue Shift- Crystal Beading
Dark Blue w/ Purple Shift- Blue Frosting
Orange- Moonlit Dance
Green- Twist Of Lime
Dark Pink/Red- Ruby Ring
Med. Blue w/ Purple Shift- Tender Teal
Purple w/ Gold Shift- All Aglow

All very sparkly, glittery, and some color shifting......and yet.
Many of them look way to familiar...to me.

Many of these are very similar to colors in the HD collection.

Sparkling Rose= LCD
Blue Frosting= Laser
Ruby Ring= Byte
Tender Teal= DVD
and there are many dupes of Crystal Beading

I do plan on picking up...Moonlit Dance,Twist Of Lime and All Aglow
as I feel these are the 3 colors that the HD collection were missing.(swatches coming soon)


 Let me know if you pick any up.

 Don't Forget To Follow....It's Painless I Promise

*TILL NEXT TIME*

Tuesday, September 25, 2012

Starting To Feel Like Fall !!!!

Fall is my favorite time of year. The colors, food, fashion and being from the south, the cool weather and nothing tells you fall is coming like being able to drive down the road with your windows down (because normally you blast your AC as high as it will go). So when I got to the salon today I got the urge to use some beautiful fall colors for my nail art.


Start with 2 coats of Sally Hansen
"Bronze Ablaze"
Insta-Dri


Then grab your makeup sponge
 and get these (or like colors ready)

Sally Hansen Insta-Dri "Coco A-Go-Go"
Sally Hansen Insta-Dri "Bronze Ablaze"
Sinful Colors "This Is It #832"
Sally Hansen Xtream Wear "Golden-I #485"

Paint a line of each color next to the other in the patten you want them to show up on the nail.
Then soak them up with the flat edge of your sponge.

Now lightly pat or roll the sponge on your nail.
(If you are using light or sheer colors you may have to do this a few times)


I then painted all the nails with Sally Hansen "Set The Stage".
You can never have to much glitter.


I loved this look....and you can feel free to stop here, just topcoat and done....
But not me!

I used loose gold glitter and put it on the "moons" of my nails.
Placed a brown crystal on my ring finger and put
bronze glass beads and gold rhinestones around it.
Then I used stripping tape in gold to make a quilted pattern on my thumb
and placed a gold rhinestone where the points met.

Topcoat And Done


I hope you like it!
&
I hope you try it!

 Don't Forget To Follow....It's Painless I Promise

*TILL NEXT TIME*